Saturday, 12 April 2014

Job Chaining in Hadoop

Chaining is an instructional procedure. As Hadoop is designed for batch processing of data, it is worth important to know the execution of series of Jobs without manual intervention. 
In practical situations, not every task can be solved using single map reduce program. We may need multiple mappers & reducers to complete a specific task where the output of previous map reduce program may be required as input to the successive mapper, & so on.
Mapper1 -->Reducer1->Mapper2 -->Reducer2-->Mapper3 -->Reducer3  ...
 Furthermore there might be conditional dependencies existing across different jobs. If the output of certain kinds of job is of X type, feed output to the Y job else feed output to Z job. 


 Hadoop provides an easiest way to chain job using JobControl class which construct a job control for a group of jobs. JobControl gives flexibility to add collection of jobs, its job states, get ready, running, waiting, & failed jobs.  We add jobs using JobControl instance addJob(controlledJob1) method. Any depending job can be added using addDependingJob(jobN) method. 

Any normal job has to be an instance of Job class. This job has to be explicitly set as ControlledJob in order to chain in JobControl. 
Job job1 = JSONFileConvertJob(args);

ControlledJob cJob1 = new ControlledJob(conf);
cJob1.setJob(job1);

JobControl jobctrl = new JobControl("JobController");
jobctrl.addJob(cJob1);

The  ControlledJob encapsulates a MapReduce job and its dependency. It monitors the states of the depending jobs and updates the state of this job. ControlledJob provides various information about job such as Job Id, Job Name etc. Furthermore it provides an extensive control over a particular job such as setting Job Id, Job Name, Job state, submitting job, killing job etc. The related interdependent groups of jobs can be placed under ControlledJob which will be placed at JobControl  being a top level master. 

Finally the JobControl instance is run using run() method. We can use a thread  to start JobControl providing an instance of  JobRunner having JobControl  instance as argument of Runnable JobRunner as below. 
Thread jobRunnerThread = new Thread(new JobRunner(jobControlInstance))
jobRunnerThread.start()

JobControl provides a method allFinished() to check whether all the jobs are finished or not. We can provide a continuous loop to get latest statics of running jobs periodically at certain interval using Thread.sleep(sleepTime). Finally when all jobs are executed successfully, JobControl stop() will be used to set the thread state to STOPPING so that the thread will stop when it wakes up.


Here is a simple example of job chaining where the first job converts an input textFile of temperature data into JSON file storing it in HDFS. The second Job takes the JSON file as input at performs the map-reduce operation.  


Add the below arguments at run configuration of CustomFileConverterJob :
sample.txt hdfs://localhost/sequentialJobOutput/ hdfs://localhost/sequentialJobOutput/reduce/

You can use the following data set as sample.txt file.

0067011990999991950051507004+68750+023550FM-12+038299999V0203301N00671220001CN9999999N9+00001+99999999999
0043011990999991950051512004+68750+023550FM-12+038299999V0203201N00671220001CN9999999N9+00221+99999999999
0043011990999991950051518004+68750+023550FM-12+038299999V0203201N00261220001CN9999999N9-00111+99999999999
0043012650999991949032412004+62300+010750FM-12+048599999V0202701N00461220001CN0500001N9+01111+99999999999
0043012650999991949032418004+62300+010750FM-12+048599999V0202701N00461220001CN0500001N9+00781+99999999999


Here the first argument will be the simple input temperature driver data file, the second argument provides the directory to store the output of the first job, which will be JSON file, & the last argument will provide the directory to store reduced job output.   

public class CustomFileConverterJob extends Configured implements Tool  {
       Configuration conf = new Configuration();
       public int run(String[] args) throws Exception
       {
      
              if(args.length !=3) {
                     System.err.println("Usage: Temperature driver:
                     <Input file> <input path to converted file> <outputpath>");
                     System.exit(-1);
              }
             
              conf  = getConf();
             
              /**
               * Add Jobs in chaining
               */
              Job job1 = JSONFileConvertJob(args);
                           
              ControlledJob cJob1 = new ControlledJob(conf);
              cJob1.setJob(job1);
         
              /**
               * JSON input file job
               */
              Job job2 =  mapJobFromJSONInputFile(args);
              ControlledJob cJob2 = new ControlledJob(conf);
              cJob2.setJob(job2);
             
             
              JobControl jobctrl = new JobControl("JobController");
              jobctrl.addJob(cJob1);
             
              jobctrl.addJob(cJob2);
              cJob2.addDependingJob(cJob1);
              
              
              Thread jobRunnerThread = new Thread(new JobRunner(jobctrl));
              jobRunnerThread.start();

              while (!jobctrl.allFinished()) {
                     System.out.println("Still running...");
                     Thread.sleep(5000);
              }
              System.out.println("done");
              jobctrl.stop();
             
            
              return 0;
        }

       /**
         * Deletes the specified file or directory
       */
       public static void deleteFileOrDirectory(String inputPathOrFile) throws IOException{
        
              Configuration conf = new Configuration();
              conf.set("fs.default.name""hdfs://localhost:8020/");
             
              FileSystem fs =  FileSystem.get(conf);
             
              Path path = new Path(inputPathOrFile);
              if(fs.exists(path)){
                     fs.delete(path, true);
              }
       }

/**
        * This Job takes input from JSON file
        * Performs map reduce operation
        */
       public Job mapJobFromJSONInputFile(String[] args) throws Exception{
              conf.set("jsonInput.start""{");
              conf.set("jsonInput.end""}");
              Job job = new Job(conf);
              job.setJarByClass(CustomFileConverterJob.class);
              job.setJobName("Process map reduce job from JSON file");
              job.setMapperClass(MaxTemperatureJSONMapper.class);
              job.setReducerClass(MaxTemperatureReducer.class);
              job.setOutputKeyClass(Text.class);
              job.setOutputValueClass(IntWritable.class);
              job.setInputFormatClass(JsonInputFormat.class);
              FileInputFormat.addInputPath(job, new Path(args[1]+"part*"));
              FileOutputFormat.setOutputPath(job,new Path(args[2]));
                    
              return job;
       }
/**
        * This Job takes any raw text file
        * Converts it into JSON file
       */
       public Job JSONFileConvertJob(String[] args) throws IOException{
             
              Job job = new Job();
              job.setJarByClass(CustomFileConverterJob.class);
              job.setJobName("JSON file converter job");
             
             
              job.setMapperClass(JSONFileConverterMapper.class);
              job.setReducerClass(MaxTemperatureReducer.class);
              job.setNumReduceTasks(0);


               job.setOutputKeyClass(IntWritable.class);
            job.setOutputValueClass(Text.class);
          
              FileInputFormat.setInputPaths(job,  new Path(args[0]));
              /**
               * Custom JSON OutputFormatter Class
               * This class will assist you to write you custom JSON class
               */
              
              FileOutputFormat.setOutputPath(job, new Path(args[1]));
             
              return job;
       }
}

Here is the custom input  mapper file which is used to convert the sample.txt input file into JSON.

public class JSONFileConverterMapper extends Mapper<LongWritable, Text, LongWritable, Text> {
      
       static Logger log = Logger.getLogger(JSONFileConverterMapper.class);
      
       private String line;
       private String year;
       private int airTemperature;
       private String quality;
      

       @Override
       public void map(LongWritable key, Text value, Context context) throws  IOException, InterruptedException{
             
              line = value.toString(); //convert a value to string
              year = line.substring(15, 19);
              if (line.charAt(87) == '+') { // parseInt doesn't like leading plus
                                                                     // signs
                     airTemperature = Integer.parseInt(line.substring(88, 92));
              } else {
                     airTemperature = Integer.parseInt(line.substring(87, 92));
              }
              quality = line.substring(92, 93);
             
             
              Gson gson = new Gson();
              JSONFileConverterMapper obj = new JSONFileConverterMapper();
                     obj.line = line;
                     obj.airTemperature = airTemperature;
                     obj.year = year;
                     obj.quality = quality;
           String json = gson.toJson(obj);
           Text jsonText = new Text();
           jsonText.set(json);


              IntWritable intt = new IntWritable();
              intt.set(123);
      
              context.write(null, jsonText);
       }
}

Here is the custom  input format reader used for parsing JSON string.  

public class JsonParser {

       public static class JsonInputFormat extends TextInputFormat {

              public static final String START_TAG_KEY = "jsonInput.start";
              public static final String END_TAG_KEY = "jsonInput.end";

              public RecordReader<LongWritable, Text> createRecordReader(
                           InputSplit split, TaskAttemptContext context) {
                     return new JsonRecordReader();
              }

              public static class JsonRecordReader extends
                           RecordReader<LongWritable, Text> {
                     private byte[] startTag;
                     private byte[] endTag;
                     private long start;
                     private long end;
                     private FSDataInputStream fsin;
                     private DataOutputBuffer buffer = new DataOutputBuffer();

                     private LongWritable key = new LongWritable();
                     private Text value = new Text();

                     @Override
                     public void initialize(InputSplit split, TaskAttemptContext context)
                                  throws IOException, InterruptedException {
                           Configuration conf = context.getConfiguration();
                           startTag = conf.get(START_TAG_KEY).getBytes("utf-8");
                           endTag = conf.get(END_TAG_KEY).getBytes("utf-8");
                           FileSplit fileSplit = (FileSplit) split;

                           // open the file and seek to the start of the split
                           start = fileSplit.getStart();
                           end = start + fileSplit.getLength();
                           Path file = fileSplit.getPath();
                           FileSystem fs = file.getFileSystem(conf);
                           fsin = fs.open(fileSplit.getPath());
                           fsin.seek(start);

                     }

                     @Override
                     public boolean nextKeyValue() throws IOException,
                                  InterruptedException {
                           if (fsin.getPos() < end) {
                                  if (readUntilMatch(startTagfalse)) {
                                         try {
                                                buffer.write(startTag);
                                                if (readUntilMatch(endTagtrue)) {
                                                       key.set(fsin.getPos());
                                                       value.set(buffer.getData(), 0,
                                                                     buffer.getLength());
                                                       return true;
                                                }
                                         } finally {
                                                buffer.reset();
                                         }
                                  }
                           }
                           return false;
                     }

                     @Override
                     public LongWritable getCurrentKey() throws IOException,
                                  InterruptedException {
                           return key;
                     }

                     @Override
                     public Text getCurrentValue() throws IOException,
                                  InterruptedException {
                           return value;
                     }

                     @Override
                     public void close() throws IOException {
                           fsin.close();
                     }

                     @Override
                     public float getProgress() throws IOException {
                           return (fsin.getPos() - start) / (float) (end - start);
                     }

                     private boolean readUntilMatch(byte[] match, boolean withinBlock)
                                  throws IOException {
                           int i = 0;
                           int c = 0;
                           while (true) {
                                  int b = fsin.read();
                                  System.out.println((char)b);
                                  System.out.println((char)match[i]);
                                  System.out.println((char)startTag[i]);
                                  // end of file:
                                  if (b == -1)
                                         return false;
                                  // save to buffer:
                                  if (withinBlock) {
                                         if (b == startTag[i]) {
                                                c++;
                                         }
                                         buffer.write(b);
                                  }
                                  // check if we're matching:
                                  if (b == match[i]) {
                                         if (withinBlock) {
                                                if (c == 0) {
                                                       i++;
                                                } else {
                                                       i = 0;
                                                       c--;
                                                }
                                         }
                                         else{
                                                i++;
                                         }

                                         if (i >= match.length)
                                                return true;
                                  } else
                                         i = 0;
                                  // see if we've passed the stop point:
                                  if (!withinBlock && i == 0 && fsin.getPos() >= end)
                                         return false;
                           }
                     }
              }
       }

}


Here is the custom input JSON mapper file which is used to parse the JSON input string into individual elements. 

public class MaxTemperatureJSONMapper extends
              Mapper<LongWritable, Text, Text, IntWritable> {

       private static final int MISSING = 9999;
       static Logger log = Logger.getLogger(MaxTemperatureJSONMapper.class);

       @Override
       public void map(LongWritable key, Text value, Context context)
                     throws IOException, InterruptedException {

              log.setLevel(Level.INFO);
              log.info("Map key:-" + key);

              String line = value.toString();

              JSONObject myJson;
              try {
                     myJson = new JSONObject(line);
                     String year = myJson.getString("year");
                     int airTemperature = myJson.getInt("airTemperature");
                     String quality = myJson.getString("quality");
                     context.write(new Text(year), new IntWritable(airTemperature));

              } catch (JSONException e) {
                     log.error("JSON conversion exception");
                     e.printStackTrace();
              }

       }
}

Here is the Reducer class implementation.

public class MaxTemperatureReducer extends
              Reducer<Text, IntWritable, Text, IntWritable> {

       @Override
       public void reduce(Text key, Iterable<IntWritable> values, Context context)
                     throws IOException, InterruptedException {

              int maxValue = Integer.MIN_VALUE;
              for (IntWritable value : values) {
                     maxValue = Math.max(maxValue, value.get());
              }
              context.write(key, new IntWritable(maxValue));
       }
}


That's it on job chaining. Here I have shown a simplest example of taking the raw text file as input to first job, feeding the output- the JSON file as input to the second Job & perform map-reduce operation on it. There are multiple other ways to chain a job in hadoop.  

Cheers 
Happy Learning :)


Thursday, 6 March 2014

FUSE OSGI with CXF based web services

FUSE OSGI:

Overview:
JBoss Fuse is an open source integration platform based on Apache ServiceMix that supports JBI and OSGi for use in wide ranges of enterprise application. It is robust SOA infrastructure that provides a standardized methodology, server, and tools to integrate components in mission-critical applications.
Fuse ESB has the following layered architecture:
·         Technology layer—includes technologies such as JBI, JAX-WS, JAX-RS, JMS, Spring, and JEE
·         Fuse ESB kernel — it is a wrapper layer around the OSGi container implementation, which provides support for deploying the OSGi container as a runtime server.
·         OSGi framework —it implements OSGi functionality, including managing dependencies and bundle lifecycles.
The following diagram shows architecture of fuse ESB.

·        Console: It manages services, installs and manages applications and libraries, and interacts with the Fuse ESB kernel runtime.
·        Logging: Provides a powerful logging system to display view and change log levels.
·        Deployer: It supports hot deployment of OSGI bundles, upon updating or deletion changes are automatically reflected.
·        Spring DM: Simplifies building spring application that runs in an OSGI.


Installation:
Fuse can be easily installed into windows systems.
 Search for Fuse ESB Enterprise, download windows installer & install it in the same way as other applications are installed into windows.
I suppose the installation is done at “C:\FuseESBEnterprise-7.0.1”, where you will see all the fuse ESB related installation folder and files.

FUSE ESB Configuration:
All the OSGI configuration files are located at InstallDir/etc directory. A configuration is a list of name-value pairs read from a .cfg file in fuse.
org.apache.karaf.features.cfg: This contains configuration of list of features available in fuse.  While running Fuse, it will look for this configuration file to load all the features.  If you want your custom feature to be added in fuse, then you need to add a custom feature file in the featuresRepositories section as below.
featuresRepositories=\
                 mvn:org.apache.karaf.assemblies.features/standard/2.2.5.fuse-70-084/xml/features,\

In above example, I have added custom-features.xml feature file to a feature repository section. This feature file will contain all of my project specific bundles & other features which are not natively available in fuse such as hibernate features, spring features, Junit features, cache features which are required in your application to deploy a bundle.
The features are described in a features XML descriptor. 
Here is an example of custom-features.xml file:


Here, you can see the feature file that contains the feature named “hibernate”, then <bundle></bundle> tag which is used to include the specific feature file. For ex- if I need a hibernate jar to be included in my bundle, I am giving a reference name.
It is important here to understand that some features are provided through fuse itself. The mvn:org.hibernate/com.springsource.org.hibernate/3.3.2.GA is provided by fuse itself. However all the features that are needed in your application, might not be provided from fuse. In that case you need to install it through your system directory itself.
<bundle>wrap:file:///C:/FuseESBEnterprise-7.0.1/lib/ext/Juint/junit/4.7/junit-4.7.jar</bundle> is an example of installing a bundle through the file system.
To install a bundle through mvn repository, we use a command: mvn:groupId/ArtificatId/Version. The last 2 bundles common & group are an example of installing application specific bundle through maven repository.

Enable Debugging:
You can enable debugging in a fuse by editing property /bin/karaf.bat or in fuseesb.bat
KARAF_DEBUG=true
set DEFAULT_JAVA_DEBUG_OPTS=-Xdebug -Xnoagent -Djava.compiler=NONE -Xrunjdwp:transport=dt_socket,server=y,suspend=n,address=5005
Here 5005 is a debug port allocated for fuse.

Configuring HttpPort:
Open /etc/system.properties , modify the port number
org.osgi.service.http.port=8181

Starting fuse:
You can start fuse by running a fuseesb.bat file located at /bin directory. By default fuse start deploying native bundles first which are around 218. After that an application specific custom bundles will be deployed. All the deployed bundled are seen at \data\cache directory. You can monitor the progress of deployment through a log file which is created at \data\log directory. The log file greatly helps us to roll out exiting deployment errors & informations.

Modifying an Existing Maven web service Project to work with fuse:
An existing modular maven project can be easily deployed at fuse with some minor changes at POM file.
ð  Modify a POM to generate bundle:  To configure a maven to generate bundle we need basically 2 things :
o    Change the POM's package type to bundle: <packaging>bundle</packaging>
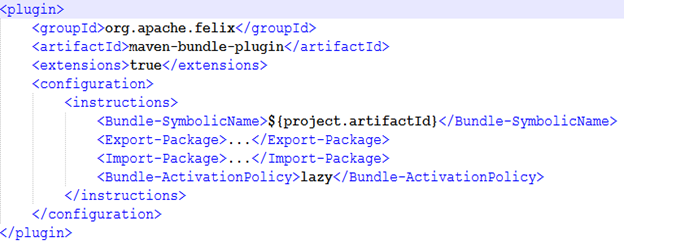
o   Add the Maven bundle plug-in:


All dependent packages that are required for an application bundle need to be explicitly mentioned at <Import-Package> section. For example for a web service project that uses Apache cxf component need to include the following dependent packages.


Apart from this, if your application is based on Hibernate & Spring, you need to include those packages as well inside import section. Further-more all our application specific components are required to be included. These all imports are mandatory for maven-bundle-plugin to generate Manifest.Mf file which can be seen inside the bundle at:
                             data\cache\bundleName\version0.0\bundle.jar\META-INF\ location
While application is exposed through a client, the fuse will use Manifest.Mf file to read and locate related information about this specific bundle.
In <Export-Package> section, we provide those package which are required outside of this bundle & useful to other bundle. The exported package of bundle can be imported by other bundles if they are dependent on those packages.
Here is a sample POM:


Few useful FUSE ESB commands:
Installing a new bundle:
The following commands install a new bundle through a file and maven repository respectively.
·         osgi:install -s file:D:/fuse-test/test/common/target/test.jar
·         osgi:install mvn:com.test.plan/plan/0.0.1-plan
·         list: Provides list of all installed bundles in the system
·          
·         osgi:start : Starts a specific bundle . Eg: osgi:start 130  will start bundle number 130
·         osgi:stop : Stops a specific bundle
·         osgi:uninstall: Uninstalls a bundle with provided bundle id. Eg: osgi:uninstall 130
·         osgi:stop: Stops a bundle Eg: osgi:stop 130
·         osgi:bundle-level: Gets or sets the start level of a given bundle.
·         osgi:headers: Displays OSGi headers of a specified bundle.
·         osgi:refresh: Refreshes the bundle.
·         osgi:resolve: Resolves the bundle.
·         osgi:restart: Restarts a bundle.
·         osgi:shutdown: Shuts down the OSGI framework.
·         osgi:update: Updates the bundle.
·         commandName –help: Displays the online help for command X


When you hit a command list at console, it will list all the bundles with their bundle id & their states – Active, started, Stopped etc.

Changing default root URL:
By default CXF based web services in Fuse OSGI publishes an endpoint URL with /cxf extension. For example if your project is hosted as 8181 port, web service will be invoked through http://localhost:8181/cxf/YourWebservice?wsdl.
This feature is often messy, because I do not want endpoint URL root name to be cxf. Instead I would be happy if I can update the name  related an application. In sort I would like a name such as http://localhost:8181/yourApplication/YourWebservice?wsdl.
To do this, fuse does not provide a default mechanism. Instead we need to add one file named
org.apache.cxf.osgi.cfg, place it in /etc directory and add the following line to the file.
org.apache.cxf.servlet.context=/yourApplication

This will override the default endpoint root URL name provided by the CXF component.

       
Troubleshooting:
If two application server are using same port Example – Jboss & Fuse, you will get the following messy message at the fuse console:
Caused by: java.io.IOException: Cannot bind to URL [rmi://localhost:1099/karaf-root]

This means existing port 1099 is already in use by some other application.

In /etc  directory check the configuration file org.apache.karaf.management.cfg and update the following property.

rmiRegistryPort = 1100

Update the same configuration to system.properties file too.


Friday, 17 January 2014

Running C with GCC compiler in windows with Netbeans IDE

This pretty simple layman question, but still some tricky to install GCC compiler in windows, making functional with C or any thing else C++, Fortan etc.

Recently, i need to run program for OpenMP (For parallel programming  ), parrallel thread executed in order to complete my course syallabus as  a part of Advance computer architecture. So little time, it took to initially figure out how to install it, & work for it with GCC. Prior to it, it was never been with GCC, all we have is turbo C++ Blue screen, in college time. But now that was obsolete, say working to as similar as in early 90's. So need change there.  So here it goes.

Installing on window there is: MinGw( www.mingw.org/)  compiler system that seems fine. It give you the windows installation manager
package from where you can install all the required package one by one exactly as similar as linux way.


Download and Run MinGw installation manager.
We need to install following packages as mandatory for C/C++ .
1) MinGw-Developer tool
2) mingGW32-base [This is required for C]
3) mingGwGcc-G++ [This is for C++]4) msys-base  [It include core basic utility functions]


After installation of all those package, 
Create a new project in NetBeans
Select tab C/C++ Applications 


The general package structure will be created. 
Now you have some tricky task. Those are setting environmental variable that is [Path] variable for MinGw and msys in your 
windows maching (Right Click My Computer-->Properties->Advanced Properties-->Environment Variable)

You need to set the path variable upto the bin directory. For ex : If your MinGw is installed as C:\MinGw then
path will be C:\MinGW\bin
similarly for mySys it would be C:\MinGW\msys\1.0\bin    
Note that place semicolon(;)  before and after of these variable entries in path variable .

Next you need to set configuration in you netbeans. For that. 
Go to Tools -->Options-->C/C++ tab

There most probably, [Make command] tab will be not mentioned explicitly, you need to mention it ,
browse the button and select C:\MinGW\msys\1.0\bin\make.exe file of MySys. 

Check all associated variable as well , if they are set correctly. 
Finally build the project , if it is build successfully, Congratulations.. !! 
You are done. ..


Cheers.. !!
Happy Learning. !!!

Tuesday, 7 January 2014

How to fix this window is not genuine error in windows 7

Guys, the problem was, since so many months i was getting this error, i used to always cancel "windows not genuine message" & then run my computer.
Today, it was extreme !! Normally i don't care for desktop background & it was always black because of windows not genuine, As i changed at set the windows background wall, after some time, it automatically changed my background old nasty black background. So it was quite hectic. I thought , common get rid of this.

So here is the one step solution.

>> Run command line as "Administrator"
>>Then type "SLMGR -REARM" 

After some time you will get, command executed successfully message which ask you to restart the system.

Restart it , You will never get "Not genuine windows message" !!

Happy Learning
Cheers ..

Making a bootable windows 7 disk from file

Making a bootable windows 7  disk from the copied files from windows 7 disk:
-----------------------------------------------------------------------------------------

Guys, this was really a hectic task , if you are not aligned with the proper techniques to make bootalbe windows.  Last night, it wasted by whole night too. 

The problem was  my brother's OS get crashed, now I don't have bootable DVD, only all i have is , windows splitted copied files. 
So my first choice was Nero, I didn't have Nero too, downloaded Nero 14 trial for 15 days , tried to make bootable with it, but it sucked me, all it allowed was to allow burning maximum file size of 200MB. :( 

My Next try was Nero 7, Okey it was very difficult to get if from internet for free, finally got it, from some where, a cracked version, Installed and tried to make bootable DVD for windows 7 , again it sucked me, it only allowed me to make a bootable file that exceeds no more than 2GB, I was having 3.4GB of windows 7 raw file. :( What to do !!!

Wasted one night !!
Next I came up with the solution, found a very good developer tool known as Image burn (http://www.imgburn.com/) having a file size of just 3.3 MB, & was awesome. !!! Can not imagine, such a decent and best tool !! 

All you need to do is :
=> Click the ‘Write files/folders to disc’ button.
=>Insert a writable DVD disc [The message in  status bar should say ready]
=>Add the installation source folder and files 
=>On Boot tab,     Locate your Boot file for windows7 generally it is located inside /Boot folder with the name etfsboot.com
[Note: this is important don't  miss it.]
=>Enter ‘Microsoft Corporation’ in the ‘Developer ID’ field.
=>Enter ’07C0′ in the ‘Load Segment’ field.
=>Enter ‘8‘ in the ‘Sectors To Load‘ field.

You are done, finally click on Build Button. Yes !! 
Cheers.. !!  Your bootable CD is ready .. !! 


Saturday, 4 January 2014

Making USB Pendrive bootable for windows 7 set up

Got a quick sort of problem today, needed to make a bootable pen drive for windows 7 from the file stored in my computer !!


So here is what i did !!
1) Run as system Administration in command
2) Navigate to cd c:\windows\system32
3) Type:  DISKPART
4) Type: LIST DISK (All the drives including your USB will be listed)
5) Type : SELECT DISK yourDiskName  (Your usb disk name as it is show by list disk)

After selecting disk type following commands sequentially:

CLEAN
CREATE PARTITION PRIMARY
SELECT PARTITION 1
ACTIVE
FORMAT FS=NTFS QUICK  (quick will enable you to format faster)
(it may take a couple minutes, depending on the USB drive size)

Than type:
ASSIGN
EXIT


Now open a command prompt and go to the directory where BOOTSECT.EXE  file is located for your windows 7 file.

After navigating to the directory : type

BOOTSECT.EXE /NT60 H:  (Here h is the usb drive name)

If all thing are executed successfully, Congratulations your pen drive has become bootable now.  Now you can copy the windows files directly into your usb drive.